Sunday, March 31, 2013

Battle of Fox's Gap-Redux


Brian H. stopped by yesterday and we restarted and played through the Fox's Gap scenario that I'd posted about last week.   This is an AAR of that game.  Again, the rules are Regimental Fire & Fury, the figures are 15mm, and the scenario is the Battle of Fox's Gap (morning engagement), Sept. 14, 1862 by
 (I believe) Mark Stricker.

The scenario is 10 turns, representing about an 2.5 hours of real time.   The playing area is 4'x3' equaling 1,200 yards by 900 yards. 


The objective was to capture the Confederate position (see photo below -the wall on the right side of the photo) and to cause the enemy Heavy Casualties (Union lose 20 stands, Confederates lose 18 stands) and more casualties then your side while doing so. 

Initial Deployment:


Union Right looking toward left


Confederate Center Looking toward Right Flank


Union Center/Left 

The Fight:

Union right/center advances

30th Ohio with Colonel Scammon attached advances towards crest

 30th Ohio advancing


On the Union left, the 23rd Ohio, commanded by future president Rutherford B. Hayes, refuses its left flank

23rd Ohio trades fire with 5th VA Cav. in skirmish line to its front


Situation on Union Right, turn 2-3.  30th Ohio is facing the 20th NC and 13th NC  (out of frame to bottom right). 23rd NC and 12th NC have advanced up the slope to confront the 12th Ohio which has shaken out into extended line formation. 

23rd NC and 12th Ohio trade volleys at the crest of the slope
General Garland attaches to 23rd NC, leads it in a charge against the 12th Ohio, driving it back!


12th Ohio driven from crest of the hill by 23rd NC


Meanwhile, on the Union left, Col. Rutherford's 23rd Ohio continues to trade fire with the 5th VA Cav. 

The 23rd Ohio panics and runs  after taking a few casualties from  the Virginia Cavalry.  Oh, the shame!
The 30th Ohio engages the 20th NC in the woods to its front  as the battle in the  center between the  12th Ohio and  23rd NC rages on.


View from behind the Confederate left flank at about turn 4-5.

In the foreground, the 30th Ohio and 20th NC trade fire.  The battle in the center between 12th Ohio and 23rd NC continues to rage with the 12th Ohio having been driven back down the hill.

The 30th Ohio panics and runs from the 20th NC

Casualties from the 30th Ohio litter the ground in front of the 20th NC

Sorely need Union reinforcements arriving on the Union right flank
around Turn 4-5.

In the meantime, the Confederate right remains idle waiting for Colonel Rutherford to get his act together, rally his unit and get it moving again.   The 5 NC did not fire a shot in the entire battle.
On the Union right the 30th Ohio tries to regroup while the 11th Ohio marches to reinforce the 12th  Ohio in the center .
Colonel Rutherford finally gets his regiment reformed!
30th Ohio has also reformed and makes its way back up the hill to make another attempt to push back the 20th NC
12th Ohio (supported by the 11th Ohio)  also makes another advance up the hill trying to oust the 23 NC which previously drove them back.

Union right around turn  7.   1st Bn, 36th Ohio (top right corner of photo)  has come on in reinforcement and is marching to  threaten the Rebel left flank.  30th Ohio has regrouped and is making its way back up the hill.

12th Ohio has charged 23 NC.....
but is driven back.
Union left.  Col Hayes' 23rd Ohio having regrouped again advances  and is fired on by the 5th Va Cav.


And they panic again and flee!  We changed history since after this poor showing Hayes' reputation was ruined and there's no way he'd have been elected President!


Back in the center, the 11th OH moves through the 12th OH still trying to push the 23 NC off the hill.
Fearing being overwhelmed by the numbers, 23 NC falls back.
On the far Union right, 1st Bn 36th OH moves to take 20th NC in the  rear.


They are fired on by the 2nd NC which has marched on as a reinforcement along with  Colonel Tew and the 4th NC.


At this point, about turn 8, we decided to call the game.  While the  Confederate center had been whittled down and forced to fall back, the Rebel regiments (all Crack or Veteran troops)  had established a defensive line along the stone wall, supported by artillery massed in the center, and with fresh troops on the right and left flanks. The Union regiments, while larger, were all trained or green troops and we didn't think it likely they'd be able to drive the Confederates off their position.  Neither side was really close to Heavy Casualties although the Union being the attackers, had taken more than the Rebs.

A fun game.  The Confederate troops being all Crack and Veterans, and on the defensive, are a tough nut to crack! (pun intended).   

Monday, March 25, 2013

Fox's Gap, Sept. 14, 1862-AAR

This is an AAR of my solo game of the morning battle of Fox's Gap, September 14, 1862. The scenario is for Regimental Fire & Fury.The rules I'm using are Regimental Fire & Fury and the figures are 15mm.   The scenario is 10 turns.

 Here are the initial deployments:

Union:

Center looking towards the right flank:
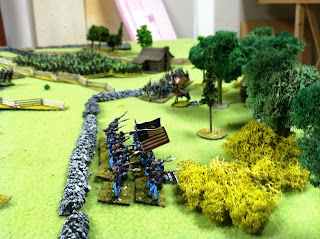


The 23rd Ohio lead by future President Rutherford B. Hayes on the Union left:


Confederate:

Right Flank and Center:


General Garland leading two North Carolina regiments onto the field:


Turns 1 & 2

First blood.   The 23rd NC attacks a small unit of WV Cavalry acting as a picket towards the crest of the mountain and with one volley drives them from the field, but not before the cavalry inflicted a stand loss on the North Carolinians and disordered them:


The Ohio regiments under the command of Colonel Scammon advance on the Union right/center:


The 30th Ohio, a large regiment, moves up to avenge the WV cavalry.   The 23rd NC fires first (in RFF defensive fire occurs before fire by units whose turn it is) but still being disordered its fire is ineffective. The North Carolinians brace themselves for a return volley from the fresh Union regiment--which proceeds to roll  a "1"!  The 23rd NC dodges a bullet (pun intended):


Meanwhile, on the Union left, Colonel Rutherford, facing being flanked by the 5th VA cavalry, has decided discretion is the better part of valor and has withdrawn his 23rd OH regiment back into the woods while  refused the left flank:


This was the situation at the end of Turn 2:  I'll continue the report in further posts.